Organize Outlook emails by thread (easy 1-minute guide)
Organize Outlook by conversation thread on Outlook for desktop, Outlook 365 web app, and on iPhone. Sort Outlook mail by conversation group.

This article will show you step by step how to organize your email conversations by threads, in Outlook desktop and mobile.
Your email correspondences can easily pile up and make you lose track of everything as you continue replying to your emails. This can make it hard to find Important messages, as they can get sandwiched between other emails. You can avoid a clumpy inbox by using Outlook email threads.
What is an email thread in Outlook?
Outlook email threads are multiple email messages grouped into one conversation. Outlook email threads keep your inbox from overflowing with individual messages and help you keep track of long back and forth correspondence. Outlook threading binds together all forwards, replies, and attachments, from the first message to the last.
Note: Outlook threading is enabled by default. If this feature is not working in your Outlook it may be disabled. Read on to see how to turn it on.
How to organize Outlook by threads
Outlook threads help you keep your inbox organized, and it’s very advised for most professionals who rely on email for daily communication. You may also want to learn other ways for organizing emails in Outlook, such as folders, color codes, flags, and rules.
Enable conversation view in Outlook
Conversations view can help reduce clutter in one’s mailbox by grouping together emails that are similarly titled.
1.“Log into” Outlook mail
2. Select the “View tab” in the home menu then select “Messages”
3. Checkmark the “Show as Conversations” option to turn this feature on
4. Select the “Folder or all “Mailboxes”
Choose All mailboxes if you want to apply this feature to your whole inbox.
And that’s it. Your emails are now arranged by Conversation view. When you scroll through your mailbox, you will see some small arrows close to the threaded emails. Click on the arrows to reveal all the messages grouped together in the thread.
When the Conversation view is enabled, you will be notified if you didn’t respond to the latest email that was sent. Outlook will typically prompt you with the message shown below.
Disable conversation view in Outlook
There are situations when this feature does not simply work for you. If so, Outlook allows you to easily turn off organize by a thread. Here we will show you how to enable and disable conversation view in Outlook.
1.“Log into” Outlook mail
2. Select the “View tab” in the home menu then select “Messages”
3.Uncheck the “Show as Conversations” option to turn conversation view off
4. Select the “Folder or all “Mailboxes”
You will be prompted to confirm where the action applies to. Choose “All mailboxes” if you want to turn off thread for all your mailboxes. Choose This folder if you want the action to apply only to the current folder.
Edit conversation view
With the Conversation view turned on, you can change the way the email thread will appear in your inbox. There are 4 email thread layouts that you can choose from, See below.
1. Select the “View tab” in the home menu then select “Messages”
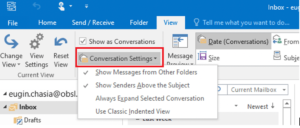
2. Click on “Conversation Settings”
A drop-down menu will appear
3. “Select” your options the desired option
Conversation view options
- Show Messages from Other Folders – If similar messages under the same Subject are found in other folders, they will appear in the conversation. This setting is important if you do not want to miss out on crucial messages that have a filter rule to land in other folders except the current one.
- Show Senders Above the Subject – Senders will always be above the Subject so that you can tell at first glance who is involved in the correspondence.
- Always Expand Selected Conversation – The messages will, by default, be expanded as you check your folders. That means you will not need to click on the expand arrow to reveal all the messages of a conversation.
- Use Classic Indented View – This is a good way to know at first glance which messages come after the other. You will have the main Subject then subsequent messages showing beneath it in an indented manner.
Clean up conversation threads
Outlook conversation clean-up can be very useful in order to save time shifting through your inbox trying to find a copy of a document. You can easily remove redundant emails to the Deleted folder or any other folder you want. This affects the back-and-forth conversations that form up in replies.
There are times when you may have replies from different mail recipients. Most of these replies may include other replies on the same message. With conversation Clean Up, you can get rid of messages that is already part of the latest reply.
1. “Select conversation” that you would like to “Delete”
You can select multiple conversations by pressing the Ctrl button and choosing the other conversations.
2. Select the “Clean Up” on the homepage menu
Navigate to the Home tab and click on the drop-down arrow next to the Clean Up option on the Ribbon.
3. “Click” on “Clean Up Conversation”
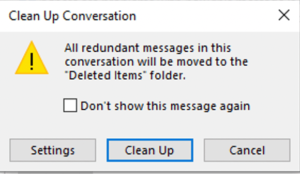
4. “Click” on “Clean Up” when a pop up appears to delete conversation
You will receive a prompt that all redundant messages in the conversation will move to the Deleted Items folder. Confirm this by clicking on Clean Up.
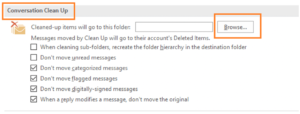
You can change the destination of the redundant messages using the Settings option. Navigate to Conversation Clean Up and Browse to the folder where cleaned-up items move to.
Why is Outlook not grouping conversations?
Outlook will fail to group conversations if you do not sort emails in the thread by date. If you sort the folder using any other criteria, the option Show as Conversations will be greyed out, hence not usable.
You can confirm how your emails are sorted from the View tab under the Arrangement group.
Conclusion
We have taken you through everything that you need to know about organize emails by thread in Outlook. The ability to thread your emails, use categories, and group conversations can make your folders look neat. We hope this guide helps you make the most of Outlook and become more productive. Oh and don’t forget your outlook signature 🙂


